

How To Increase Virtual Memory In Windows 10 For Gaming
Does your Windows 10 or Windows 11 installation feel similar information technology slows down over time? You're not imagining it. As the hardware requirements for pop apps increase, your aging hardware suffers.
Often at that place is a simple culprit: low memory. If you don't accept enough system retentivity, your system will ho-hum to a crawl when you attempt to run multiple resources-intensive programs.
Here'south how you fix your Windows 10 or Windows xi virtual retentivity size to make those issues disappear.
What Is Virtual Memory?
Your computer has two types of memory: A hard drive or solid-country drive and RAM.
Your hard drive is where your operating system lives, as well every bit your photos, music, games, documents, and otherwise. Your RAM stores program-specific data. It is much faster only also more volatile, interim equally a working storage surface area for the programs and files you have open.
So, what is virtual retentiveness?
Well, if you use all the RAM bachelor to your arrangement, it will utilize virtual memory—as well known every bit a swap or paging file—to provide a temporary expansion. Your organization'southward virtual memory does this using role of your hard-drive memory to expand your RAM effectively. And so, this virtual memory is extremely useful. It allows your organisation to handle more than information for more programs than previously available.
Withal, your hard drive retention (and fifty-fifty a faster solid-state drive) is much slower than your superfast RAM, so your performance can suffer.
When your retentiveness runs low, the paging file comes into play. Some data stored in the RAM will move to the paging file, providing additional space for loftier-speed memory functions.
Running Low on Virtual Memory
If your virtual memory runs low, y'all will encounter the following message:
Your organization is low on virtual memory. Windows is increasing the size of your virtual retention paging file. During this procedure, retention requests for some applications may be denied. For more information, see help.
Manually increasing the size of your paging file will convalesce this message, as per the fault message. Windows sets the initial virtual memory paging file equal to the corporeality of installed RAM. The paging file is a minimum of 1.5 times and a maximum of three times your physical RAM.
Yous can calculate your paging file size using the following organization. For example, a arrangement with 4GB RAM would take a minimum of 1024x4x1.5=six,144MB [1GB RAM x Installed RAM x Minimum]. Whereas the maximum is 1024x4x3=12,288MB [1GB RAM ten Installed RAM 10 Maximum].
Even so, 12GB for a paging file is enormous. I would not recommend using the upper limit. Why? Because once your paging file increases over a certain size, your organisation will become unstable. In that, the paging file is a temporary fix.
How to Increase Your Virtual Retentiveness
The natural question to ask is, "How much virtual memory should I gear up?"
Here's how you increase the size of the paging file to get rid of the virtual retention error bulletin.
- Head to Command Panel > Organisation and Security > System.
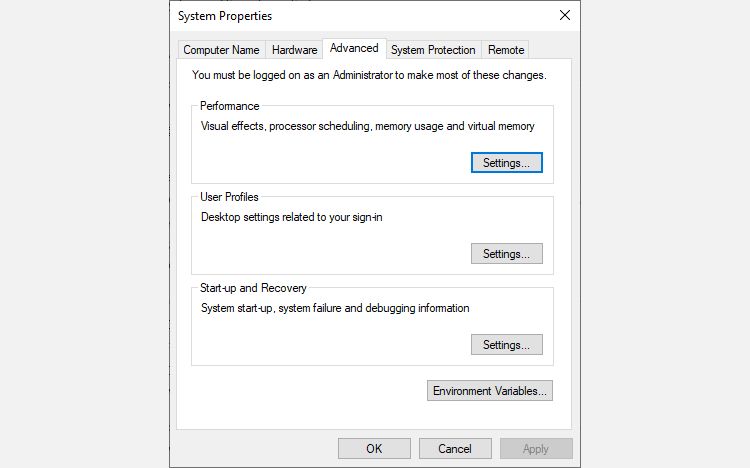
- Select Advanced Arrangement Settings to open your Organisation Properties. At present open the Advanced tab.
- Under Operation, select Settings. Open the Advanced tab. Nether Virtual retention, select Alter. Hither are your Virtual Memory options.
Please note that on Windows xi, y'all tin can take a less complex road to your Advanced System Settings.
- Press Windows fundamental + I to open the Settings app.
- Caput to Organisation > About.
- Select Advanced arrangement settings.
- Nether Performance, select Settings. Open the Advanced tab. Under Virtual retentiveness, select Change. Here are your Virtual Memory options.
The default pick is to Automatically manage paging file size for all drives. Uncheck this to enable the currently greyed-out section beneath. Select the drive you desire to edit the paging file size for. Unremarkably, this is your C: bulldoze.
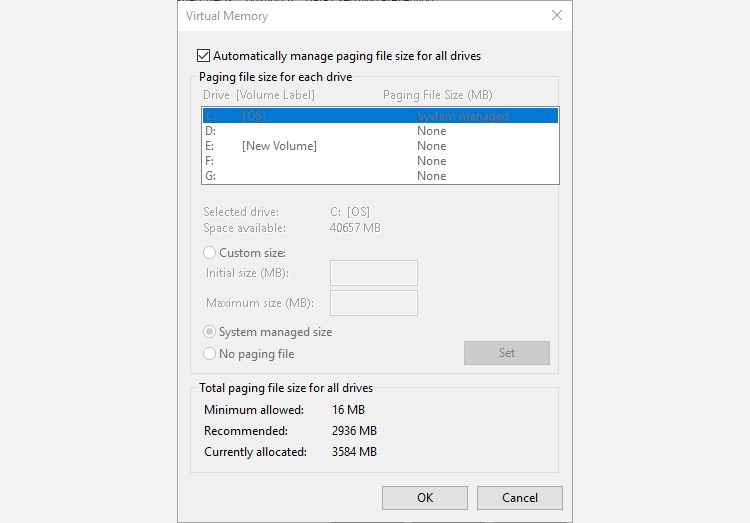
Now, select Custom size. Set the Maximum size you want for your paging file, following the recommended size for your organisation. Remember, Windows restricts the paging file size to three times the size of your installed RAM. This is to ensure system stability. Set the Initial size to the Currently allocated size (constitute below).
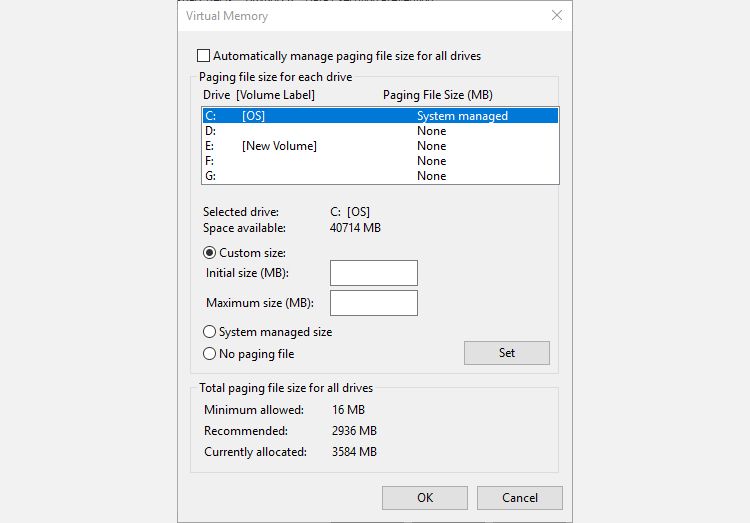
Click Fix followed past OK. You accept successfully increased your arrangement's virtual retentiveness size. +1 knowledge for the day!
Please note that Windows doesn't brandish a alert for paging file (virtual memory) size increases, but arrangement alerts are shown for decreases. A sudden decrease could crusade system damage.
Other Ways to Increase Your Virtual Retentivity
If you detect that your system still runs slowly following the paging file size adjustment, yous must consider upgrading your RAM.
Upgrading your RAM is the but way yous can increase your virtual retentiveness, by increasing the amount of overall retentiveness available to the system. In that, you volition alleviate the virtual memory issue during the process and could see a boost to your organization speed, too.
At that place are endless tutorials to assistance you through this task, both text and video, and many tin can be institute specifically for your device. A great identify to start figuring out uniform RAM is PC Part Picker.
What Are the Best Virtual Memory Settings?
I'm inclined to get out my virtual memory settings alone. Windows 10 and Windows eleven manage your concrete retentivity and your virtual retentiveness, along with it. If y'all go along hitting the paging file memory limit, y'all should consider upgrading your RAM. It will brand a world of deviation, especially for older systems.
Source: https://www.makeuseof.com/tag/virtual-memory-low-heres-fix/
Posted by: crusecamen1959.blogspot.com
0 Response to "How To Increase Virtual Memory In Windows 10 For Gaming"
Post a Comment